If you’re looking for a knife that can handle tougher cutting tasks, then a serrated knife is the way to go. These knives have saw-like teeth that make them ideal for slicing through tough materials like bread and meat.
Making your own serrated knife is a great way to get a custom blade that will fit your specific needs. In this tutorial, we’ll show you how to make a serrated knife using a few simple tools and materials.
First, you’ll need to gather your supplies. For this project, you’ll need a piece of steel stock, a grinder, and a welder. You’ll also need access to a heat source so that you can temper your blade.
Once you have all of your supplies, you’re ready to start creating your knife. Begin by cutting your steel stock into the desired shape and size. Next, use your grinder to create the serrated edge on your blade. Be sure to leave enough metal behind the teeth so that they are strong and won’t break off easily.
Finally, weld the handle onto your blade and heat treat it for durability. Now you have a custom-made serrated knife that is perfect for any tough cutting job!
A significant number of today’s knives have blades that are serrated. These impressive-looking blades, which may or may not include what seem to be tiny, jagged ‘teeth’ on one or both sides, are designed to cut through materials that may be too difficult for a standard blade edge.
Because producing a knife with a serrated edge might be more difficult than producing one with a smooth edge, the staff at Red Label Abrasives has provided some pointers in this blog post on how to produce serrated blades.
Advantages Of Serrated Blades
The primary benefit of blades with serrations is the increased power with which they cut. They are able to tear through materials such as plastics, fabrics, bone, and other substances that are difficult for standard blades to cut through. Other benefits include the following:
- Serrations may clear cuts more efficiently, particularly when ripping hardwoods, which is a common use for this cutting technique.
- They have a larger capacity to pierce than a blade that is smooth.
- Because they have more edges that may be cut with, blades with serrations might have a larger cutting surface area than blades without them.
- Because it has several sharp edges, it is much simpler to catch and cut through fibrous materials such as rope or line.
- Even when they are dull, serrations are able to do an efficient cutting job because they concentrate the force of the cutting motion into a smaller region.
Advantages Of Handcrafted Serrated Blades
There is a time and a place for manufactured serrated blades, but there are many compelling reasons to make your own serrated blade or to purchase one that has been created. Take, for instance:
- Before you heat treat the steel blade, you give it a handmade appearance by creating serrations one at a time using a file. After that, each individual tooth is completed, polished, and sharpened, which ultimately results in cutting edges that are more distinct and less soiled.
- The serrations on factory-made blades are normally ground from just one side of the blade, but the serrations on handcrafted blades are formed from both sides of the blade, which results in a more equal alignment and a much sharper serration.
- Because so much material has to be removed from one side of the blade in order to sharpen factory serrations, the process is more difficult. A few swift strokes are all that is required to fine-tune well-made double-sided serrations. This is because there is less surface area that has to be removed.
- Because the grinding wheels used to cut factory serrations don’t always wear uniformly throughout the automated grinding process, the serrations sometimes have an uneven appearance. The serrations on every handcrafted item have to be precisely set out by hand in order to achieve an equal fit.
- Factory serrations are seldom crisp or clearly defined since the machining technique is not as advanced as it might be. When using handcrafted serrations, each and every cut is performed separately to guarantee a sharp point is produced.
- As a result of the fact that factory serrations are produced only by machines, they do not reach all the way to the end of the grind. When it comes to delicate handcrafted serrations, the positioning of the serrations may be closer to the termination, or even into the termination, as long as there is sufficient thickness and strength at the first important tooth.
- Because the wheels used to cut the factory serrations can’t have deep peaks or valleys, the resulting serrations tend to have a lot of convex profiles.
- The serrations on factory tools never have any points. Additionally, they are not often tilted, positioned, canted, or slanted in any way to fit the handle of the knife. The grip and blade design of high-quality handcrafted knives sometimes have serrations, which provide unique cutting forces to the design.
- Because they are often ground after the blade has been heat treated, factory serrations may have a tendency to be softer than other serrations. This might lead to overheating as well as a loss of temper.
When you take the time to make your own serrated blade, you may end up with a final product that not only looks fantastic but also makes a clean cut and lasts a lot longer than its mass-produced equivalent would. Let’s get started right away, shall we?
Instructions On How To Make A Knife With Serrations
First Step: Draw The Outline Of Your Pattern
Make a mark at the spot where the center of each serration will be. Be sure that the mark is visible from the other side of the blade’s bevel.
Step 2: Cut Out The Guides
Create some grooves that may act as guidelines for the subsequent phase. Cut through the blade with a diamond blade until you reach the edge of the bevel on the other side.
Step 3: Shape The Serrations
Holding the knife at an acute angle and grinding away with a rotary cutting tool like a Dremel that has been adjusted to its lowest setting will provide the best results.
Proceed step by step until you reach the biggest possible piece. Be sure that your grinding is always centered with the guiding groove as you go through the process.
When the grooves are no longer visible, carefully apply pressure toward each tooth in the serration until a pattern emerges that is consistent throughout.
Be cautious not to overheat the blade if you plan on cutting serrations into it while you are doing so. You don’t want to mess with the heat treatment and tempering that these blades have already undergone since it helps them keep their edge longer.
Spraying the metal with lukewarm water after each pass will provide the greatest results. When steam begins to emerge from the water, this indicates that the water has reached the point where it will boil, which implies the temperature has reached 212 degrees at the very least.
Because you want to maintain an internal temperature of less than 300 or 400 degrees, you should take a break if you see steam rising from the pot.
Step 4: Clean Up The Rear Side
On the reverse side of the blade, there are certain grooves that are not as severe. At this point, burrs will begin to develop on the reverse side, therefore it will be necessary for you to remove them. It will need to be done again, but this time with just enough grinding to get rid of them.
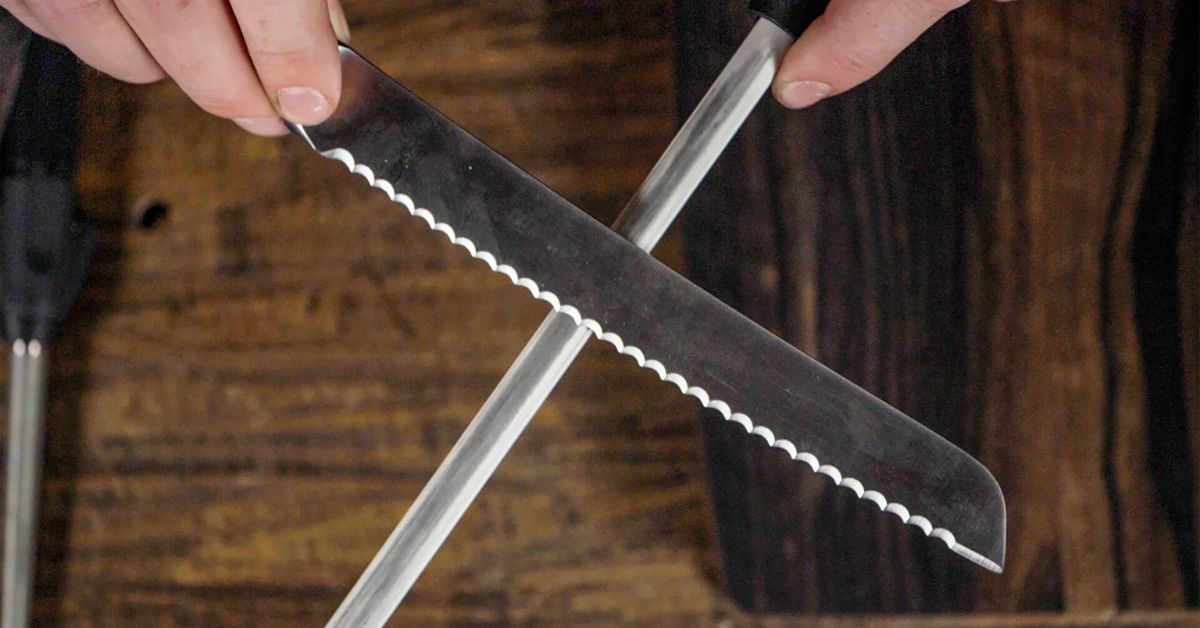
Sharpening A Serrated Blade
When compared to sharpening a chef’s knife, honing a knife with serrations requires more effort and time.
You can still sharpen your own serrated knives, despite the fact that the vast majority of people take their serrated knives to a professional to be sharpened since the most effective approach requires that each serration be honed in turn.
When sharpening your serrated knife by hand, it is recommended that you use a ceramic honing rod. The sharpening rod is designed to be inserted into the serrations of the blade so that it may hone the knife one tooth at a time.
Carry out the activities listed below:
- Beginning at the end farthest back of the blade, position the rod so that it sits in the serrated groove (the gullet). The angle of the rod has to be adjusted so that it is parallel to the chiseled incision that can be seen in the gullet.
- To get to the edge of the blade, you need to slide the rod through the gullet. It is important to carry out this procedure for each gullet. A few of sweeps ought should do the trick.
- When you have finished honing each gullet, flip the knife over and rub the flat side of it against the surface of a finishing stone with a fine grit to remove any burrs that may have formed during the sharpening process.
- Regular sharpening is the best way to maintain the excellent condition of your handcrafted serrated blades and retain the edge that is necessary for them to perform their function.